Spring Boot 应用的外部化配置与集中式配置管理
4.2 外部化配置:一次构建,多处配置
简介
在软件开发中,将配置与代码分离是一种最佳实践。Spring Boot 提供了强大的外部化配置功能,允许您在不修改、不重新编译应用程序的情况下,根据不同的部署环境调整应用程序的行为。这种方法遵循了“12-Factor App”方法论,将配置存储在环境中。
核心优势
- 不可变部署: 构建一次应用程序包,即可部署到多个环境。
- 灵活性: 通过外部配置,可以轻松更改数据库连接、凭据等。
- 可维护性: 配置与代码分离,更易于管理和维护。
Spring Boot 配置优先级
Spring Boot 会按照以下优先级顺序加载和覆盖配置属性:
- 命令行参数(Command-line arguments)
- JVM 系统属性(JVM system properties)
- 环境变量(Environment variables)
- 属性文件(Property files)如:
application.properties或application.yml) - 默认属性 (如果有定义)
下图说明了Spring Boot中属性的加载和覆盖的决策过程。
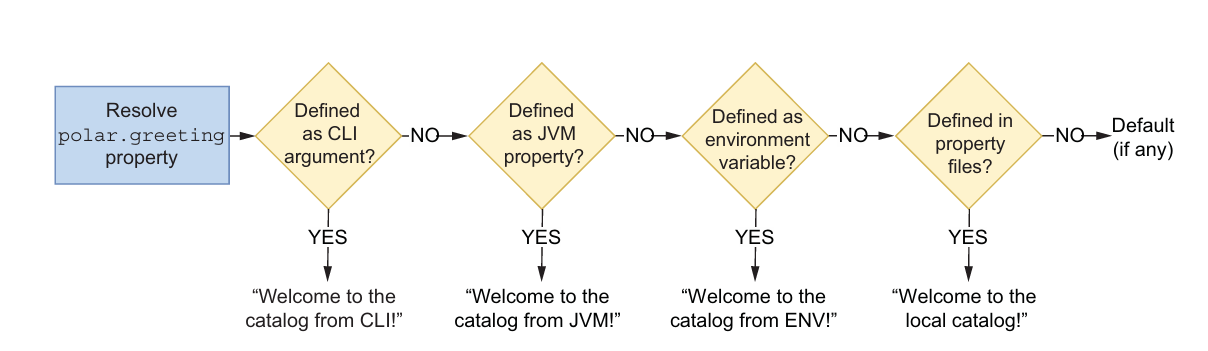
Figure 4.6 Spring Boot evaluates all property sources according to a precedence list.
实战演练:Catalog Service
假设我们有一个名为 Catalog Service 的 Spring Boot 应用程序。
打包应用程序:
bash$ ./gradlew bootJar此命令将在
build/libs目录下生成一个名为catalog-service-0.0.1-SNAPSHOT.jar的可执行 JAR 文件。运行应用程序(默认配置):
bash$ java -jar build/libs/catalog-service-0.0.1-SNAPSHOT.jar此时,应用程序将使用
application.yml文件中定义的默认配置。
4.2.1 通过命令行参数配置
Spring Boot 会将任何命令行参数转换为键/值对,并将其包含在 Environment 对象中。
示例:
$ java -jar build/libs/catalog-service-0.0.1-SNAPSHOT.jar \
--polar.greeting="Welcome to the catalog from CLI"--polar.greeting: 命令行参数,与 Spring 属性同名,使用--前缀。- 如果使用
http :9001/,输出结果将会是Welcome to the catalog from CLI.
4.2.2 通过 JVM 系统属性配置
JVM 系统属性也可以覆盖 Spring 属性,但优先级低于命令行参数。
示例:
$ java -Dpolar.greeting="Welcome to the catalog from JVM" \
-jar build/libs/catalog-service-0.0.1-SNAPSHOT.jar-Dpolar.greeting: JVM 系统属性,使用-D前缀。- 如果使用
http :9001/,输出结果将会是Welcome to the catalog from JVM.
优先级示例: 如果同时设置CLI参数以及JVM参数,CLI参数将会覆盖JVM参数,因为CLI优先级高于JVM参数.
$ java -Dpolar.greeting="Welcome to the catalog from JVM" \
-jar build/libs/catalog-service-0.0.1-SNAPSHOT.jar \
--polar.greeting="Welcome to the catalog from CLI"- 如果使用
http :9001/,输出结果将会是Welcome to the catalog from CLI.
4.2.3 通过环境变量配置
环境变量是外部化配置的推荐选项,符合 15-Factor 方法论。
示例 (Linux/macOS):
$ export POLAR_GREETING="Welcome to the catalog from ENV"
$ java -jar build/libs/catalog-service-0.0.1-SNAPSHOT.jar
示例 (Windows PowerShell):
$ $env:POLAR_GREETING="Welcome to the catalog from ENV"
$ java -jar build/libs/catalog-service-0.0.1-SNAPSHOT.jarPOLAR_GREETING: 环境变量,将点 (.) 替换为下划线 (_),并使用大写字母。- Spring Boot 的“宽松绑定”特性会自动将
POLAR_GREETING映射到polar.greeting属性。 - 如果使用
http :9001/,输出结果将会是Welcome to the catalog from ENV.
4.3 使用 Spring Cloud Config 进行集中式配置管理
背景
虽然环境变量可以很好地处理外部化配置,但在大型分布式系统中,它们可能存在以下局限性:
- 缺乏版本控制: 难以跟踪配置更改。
- 缺乏访问控制: 难以控制谁可以修改配置。
- 缺乏动态刷新: 更改配置后,通常需要重启应用程序。
- 安全问题: 难以安全地存储敏感信息(如密码)。
Spring Cloud Config 简介
Spring Cloud Config 提供了一个集中式配置管理解决方案,可以解决上述问题。它包含以下两个主要组件:
- Config Server: 一个独立的 Spring Boot 应用程序,负责从配置存储(如 Git 仓库)读取配置,并提供给客户端应用程序。
- Config Client: 一个库,集成到 Spring Boot 应用程序中,用于从 Config Server 获取配置。
技术选型比较
Spring Cloud Config 支持多种配置存储后端:
| 后端 | 优点 | 缺点 |
|---|---|---|
| Git (推荐) | * 版本控制: 易于跟踪配置更改,回滚到以前的版本。* 访问控制: 可以使用 Git 仓库的权限管理功能。* 易于集成: 与现有的 Git 工作流程无缝集成。 | * 需要 Git 基础设施。 |
| JDBC 数据库 | * 可以使用现有的数据库基础设施。 | * 缺乏版本控制。* 配置更改需要手动同步到数据库。 |
| HashiCorp Vault | * 安全存储: 专门用于存储敏感信息。* 访问控制: 提供细粒度的访问控制。 | * 需要 Vault 基础设施。* 配置更复杂。 |
| Spring Cloud Consul | * 分布式键值对存储:适用于分布式系统。 * 服务发现:Consul 还可以用作服务发现。 | * 需要 Consul 基础设施。 |
| Spring Cloud Zookeeper | * 分布式协调服务:适用于分布式系统。 | * 需要 Zookeeper 基础设施。配置复杂。 |
其他解决方案:
- 云厂商服务: 如 AWS Parameter Store, AWS Secrets Manager, Azure Key Vault, GCP Secret Manager。
- 云平台服务: Kubernetes ConfigMaps and Secrets。
架构图
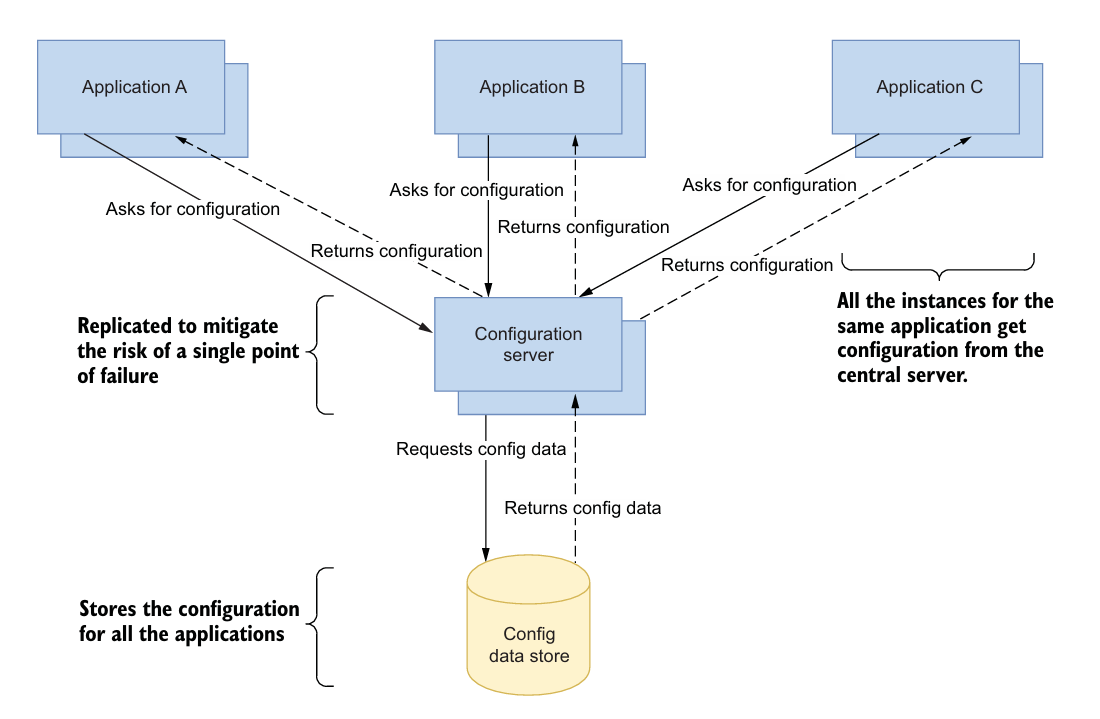
Figure 4.7 A centralized configuration server manages external properties for many applications.
实战演练:使用 Git 作为配置存储
创建 Git 仓库: 创建一个名为
config-repo的 Git 仓库 (可以是本地仓库或远程仓库,推荐使用 GitHub)。创建配置文件:
在
config-repo根目录下创建catalog-service.yml文件:yamlpolar: greeting: "Welcome to the catalog from the config server"创建
catalog-service-prod.yml,生产环境下的配置:yamlpolar: greeting: "Welcome to the production catalog from the config server"
提交并推送更改: 将配置文件提交并推送到 Git 仓库。
配置文件命名规则
Spring Cloud Config 使用以下参数来确定要使用的配置文件:
{application}: 应用程序名称 (通过spring.application.name属性定义)。{profile}: 激活的 profile (通过spring.profiles.active属性定义)。{label}: Git 分支、标签或提交 ID。
目录结构示例
/{application}/{application}-{profile}.yml
/{application}/application.yml
/{application}-{profile}.yml
/{application}.yml
/application-{profile}.yml
/application.yml
后续步骤
- 创建和配置Config Server.
- 在客户端应用程序 (Catalog Service) 中集成 Config Client。
4.3.2 设置 Config Server
Spring Cloud Config Server 本身就是一个 Spring Boot 应用程序,通过添加特定的属性来启用配置服务器功能,并将 Git 仓库作为配置数据后端。
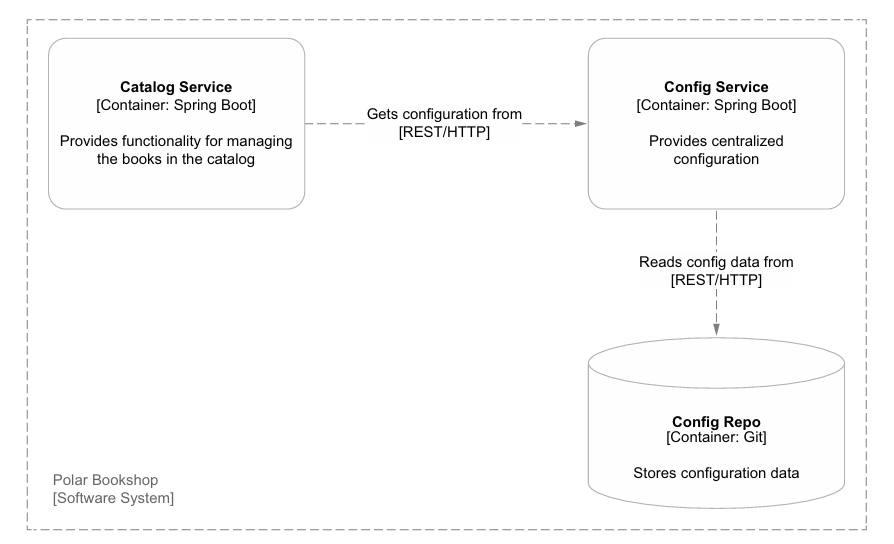
项目初始化
我们可以使用 Spring Initializr (https://start.spring.io/) 来初始化 Config Service 项目。以下是项目配置:
- Project: Gradle Project
- Language: Java
- Spring Boot: 2.7.3 (选择一个稳定版本)
- Group: com.polarbookshop
- Artifact: config-service
- Name: config-service
- Description: Centralizes the application configuration.
- Package name: com.polarbookshop.configservice
- Packaging: Jar
- Java: 17 (或您偏好的版本)
- Dependencies:
- Config Server
build.gradle 文件
plugins {
    id 'org.springframework.boot' version '2.7.3'
    id 'io.spring.dependency-management' version '1.0.13.RELEASE'
    id 'java'
}

group = 'com.polarbookshop'
version = '0.0.1-SNAPSHOT'
sourceCompatibility = '17'

repositories {
    mavenCentral()
}

ext {
    set('springCloudVersion', "2021.0.3") // 注意:Spring Cloud 版本与 Spring Boot 版本不同
}

dependencies {
    implementation 'org.springframework.cloud:spring-cloud-config-server'
    testImplementation 'org.springframework.boot:spring-boot-starter-test'
}

dependencyManagement {
    imports {
        mavenBom "org.springframework.cloud:spring-cloud-dependencies:${springCloudVersion}"
    }
}

tasks.named('test') {
    useJUnitPlatform()
}
启用 Config Server
在 ConfigServiceApplication.java 类上添加 @EnableConfigServer 注解:
package com.polarbookshop.configservice;

import org.springframework.boot.SpringApplication;
import org.springframework.boot.autoconfigure.SpringBootApplication;
import org.springframework.cloud.config.server.EnableConfigServer;

@SpringBootApplication
@EnableConfigServer // 启用 Config Server 功能
public class ConfigServiceApplication {

    public static void main(String[] args) {
        SpringApplication.run(ConfigServiceApplication.class, args);
    }
}
配置 Config Server
在 src/main/resources 目录下创建 application.yml 文件(如果存在 application.properties 文件,请将其重命名为 application.yml),并添加以下配置:
server:
  port: 8888 # Config Server 监听的端口
  tomcat:
    connection-timeout: 2s
    keep-alive-timeout: 15s
    threads:
      max: 50
      min-spare: 5

spring:
  application:
    name: config-service # Config Server 的应用名称
  cloud:
    config:
      server:
        git:
          uri: <your-config-repo-github-url> # 替换为您的 config-repo Git 仓库地址
          default-label: main # 默认分支
          timeout: 5 #连接到远程仓库的超时时间,单位是秒
          clone-on-start: true #在启动时clone远程仓库
force-pull: true #强制从远程仓库拉取,即使本地有更改也会被覆盖- 请将
<your-config-repo-github-url>替换为您之前创建的config-repoGit 仓库的 URL。
4.3.3 Config Server 的高可用
为了确保 Config Server 的高可用性,您应该在生产环境中部署多个 Config Server 实例。此外,为了增强其与 Git 仓库交互的可靠性,建议配置以下属性:
spring:
  application:
    name: config-service
  cloud:
    config:
      server:
        git:
          uri: <your-config-repo-github-url>
          default-label: main
          timeout: 5
          clone-on-start: true
          force-pull: true
4.3.4 Config Server的REST API
Spring Cloud Config Server 通过 REST API 公开配置数据。您可以通过以下端点访问配置:
/{application}/{profile}[/{label}]/{application}-{profile}.yml/{label}/{application}-{profile}.yml/{application}-{profile}.properties/{label}/{application}-{profile}.properties
测试 Config Server 启动config-service服务
./gradlew bootRun然后使用以下命令获取配置信息。 例如,获取catalog-service在default profile下的配置
$ http :8888/catalog-service/default获取catalog-service在prod profile下的配置
$ http :8888/catalog-service/prod4.4 使用 Spring Cloud Config Client
4.4.1 设置 Config Client
要在 Spring Boot 应用程序中使用 Config Client,需要添加以下依赖:
在 catalog-service 项目的 build.gradle 文件中添加:
dependencies {
    // ... 其他依赖 ...
    implementation 'org.springframework.cloud:spring-cloud-starter-config'
}
添加重试依赖:
dependencies {
 implementation 'org.springframework.retry:spring-retry'
}
配置 Config Client
在 catalog-service 项目的 application.yml 文件中添加以下配置:
spring:
  application:
    name: catalog-service  # 应用程序名称,Config Server 使用它来查找配置
  config:
    import: "optional:configserver:" # 从 Config Server 导入配置,如果Config Server没有运行,则只是打印警告信息,不影响catalog-service启动
  cloud:
    config:
      uri: http://localhost:8888 # Config Server 的地址
      request-connect-timeout: 5000 #连接超时时间,单位毫秒
      request-read-timeout: 5000 #读取配置超时时间,单位毫秒
      fail-fast: true # 如果连接Config Server失败则快速失败
      retry:
        max-attempts: 6 #最大重试次数
        initial-interval: 1000 #重试间隔时间,单位毫秒
        max-interval: 2000 #最大重试间隔时间,单位毫秒
        multiplier: 1.1 #下次重试间隔时间的乘数
测试: 首先,启动 Config Service (./gradlew bootRun). 然后启动 Catalog Service:
$ java -jar build/libs/catalog-service-0.0.1-SNAPSHOT.jar访问接口:
$ http :9001/输出结果:
Welcome to the catalog from the config server!启动Catalog Service并且指定profile为prod
$ java -jar build/libs/catalog-service-0.0.1-SNAPSHOT.jar \
--spring.profiles.active=prod
访问接口:
$ http :9001/输出结果:
Welcome to the production catalog from the config server4.4.2 Config Client 的弹性
- 超时: 使用
spring.cloud.config.request-connect-timeout和spring.cloud.config.request-read-timeout设置连接和读取超时。 - 重试: 使用
spring-retry库, 开启重试功能spring.cloud.config.fail-fast: true, 并且设置重试参数spring.cloud.config.retry.*
4.4.3 运行时刷新配置
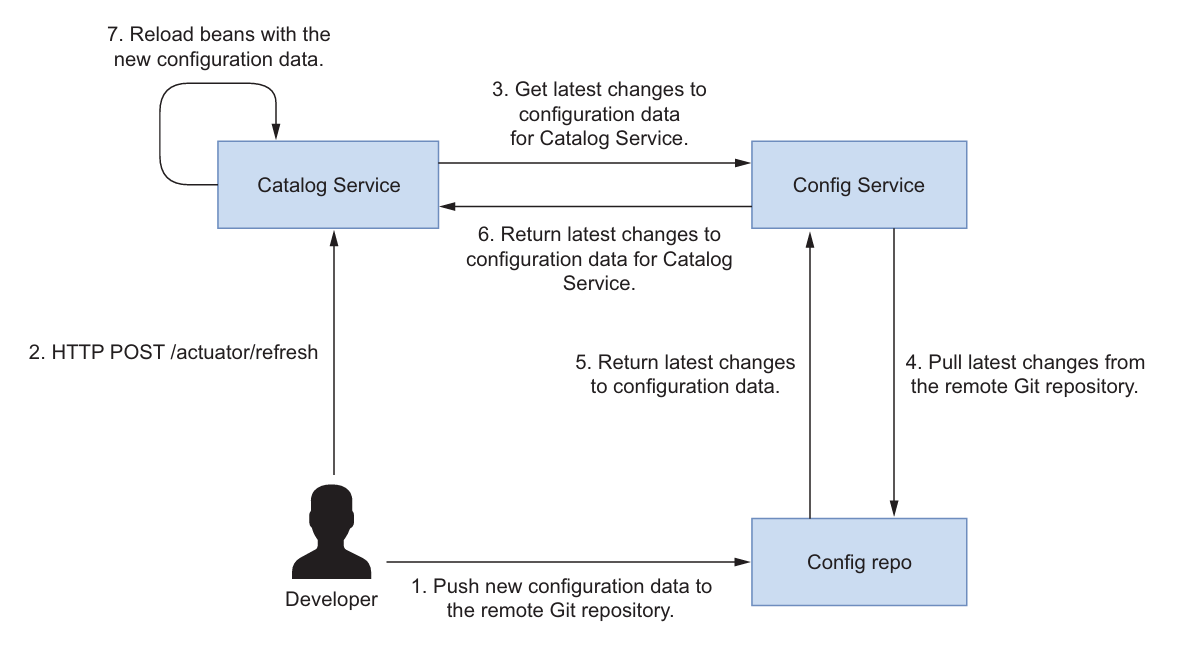
动态刷新配置的步骤
添加依赖: 在
catalog-service项目的build.gradle文件中添加 Spring Boot Actuator 依赖:groovydependencies { // ... 其他依赖 ... implementation 'org.springframework.boot:spring-boot-starter-actuator' }开启 refresh 端点: 在
catalog-service项目的application.yml文件中添加以下配置:yamlmanagement: endpoints: web: exposure: include: refresh修改并提交配置: 修改
config-repo仓库中的配置文件(例如,更改catalog-service.yml中的polar.greeting属性),然后提交并推送更改。发送刷新请求: 向 Catalog Service 发送 POST 请求:
bash$ http POST :9001/actuator/refresh验证: 再次访问 Catalog Service 的根端点,您应该会看到新的配置值。
$ http :9001/
自动刷新(高级)
在生产环境中,通常使用更自动化的方式来刷新配置,例如:
- Webhook: 配置 Git 仓库的 webhook,当配置发生更改时自动通知 Config Server。
- Spring Cloud Bus: 使用 Spring Cloud Bus 和消息代理(如 RabbitMQ)来广播配置更改事件,从而触发所有客户端应用程序的刷新。